[ad_1]
DIY Projects
By: Danny Lipford

Danny Lipford attaching string to outer rafters on pergola shade arbor.
A pergola, or shade arbor, is a great way to provide shade in your yard while allowing air to circulate. Here’s how to go about building a pergola shade arbor.
Building a Pergola Shade Arbor:
- Set Arbor Posts: Start by digging holes in the ground and setting 6”x6” pressure treated wood posts in concrete. Check your local building codes to make sure the holes are deep enough for your climate.
- Cut Arbor Posts: After the concrete has set, use a circular saw to cut the tops of the posts at the desired height so they are level with each other.
- Cut Band Joists: Miter the corners of the 2”x10” band joists so the distance between the short ends of the miters is the same length as the outside distance between the posts, or add twice the thickness of the joists (3”) to the outside distance between the posts to find the total length of each band joist.
- Attach Band Joists: Attach the band joists around the perimeter of the posts with nails or screws, so the top of the joists are flush with the top of the posts. Reinforce the joints with galvanized lag screws and washers, countersinking the holes so the lag screws are flush with the joists.
- Cut Arbor Rafters: Cut the 2”x8” rafters to length so they overhang the band joists with a decorative, curved ogee cut on one or both ends.
- Attach Arbor Rafters: Space the arbor rafters on 16” centers, and toenail the bottom of each rafter to the top of the band joists with galvanized nails. Use a string attached to the ends of the outer rafters to align the inner rafters.
- Attach Stub Rafters: Position the outer rafters flush with the outside of the band joists, and use 3” screws to attach short stub rafters to the outer rafters with the outer ends cut in the same decorative ogee design.

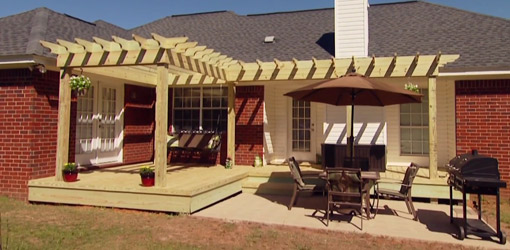
Completed pressure treated wood pergola shade arbor.
Watch this video to find out more.
Further Information

Danny Lipford: Adding a shade arbor to an outdoor space is a relatively simple process that adds character and of course shade.
Setting the posts is the first step. In this case they’ll go in the ground beneath a deck we’re re-surfacing. By digging the holes adjacent to the deck joists, the posts can be secured to the joists to stabilize them in a perfectly plumb position while we pour concrete into the holes.
The depth of that hole will be determined by your local building codes and the frost line in your area. The colder the climate, the deeper the hole.
This arbor will be independent of the house, so the posts are positioned far enough from the home’s overhang so the beams don’t contact the house. The bottom of the arbor’s band joist will be even with the bottom of the home’s fascia board, so we’re using a level to mark that point on the posts before measuring up the height of the joist to mark the post for cutting.
We’re marking all four sides because the post’s thickness requires multiple cuts to get through it. The band joists around the outside get miter cuts on each end so that no end grain is showing. We’re tacking them in place with nails as they are positioned and leveled, but later we’ll add long lag bolts to secure them more thoroughly.
The joists that rest on top of the band joists are two-by-eights with a decorative cut on one end and a simple bevel on the other end. The bevel cut on the back simply gives us clearance from the roof. The decorative cut and the spacing of the joists are a matter of personal preference, but they should be consistent all the way across the arbor. The overhand should also be consistent.
Setting the two outside joists first and pulling a string between the ends is a really good way to ensure that consistency. These joists are attached by toenailing them from both sides into the band joist beneath them.
To continue the overhang look on the adjacent side we’ve cut pieces with the decorative cut at the same length of the overhang. We’re attaching these to the side of the perpendicular joist with three-inch deck screws driven in from the back side. This is more easily done if you attach these before installing the last long joist on that side.
The result is both an attractive and functional addition to your outdoor living space.
How to Build a Pergola Shade Arbor for Your Yard
[ad_2]
Source link