[ad_1]

Stackable stone walls create a nice border and increase lawn or garden space.
Retaining walls can be a great way not only to help with erosion and water drainage, but also to create beautiful, usable garden space. And thanks to interlocking, stackable blocks, the project can be completed in a weekend.
Building a retaining wall is a tough job, but it’s something most homeowners can handle, as long as you’re able to do some heavy lifting and are willing to get dirty. Here’s what you need to know to build your own stackable retaining wall.

Stackable blocks come in many styles and colors.
Stackable Concrete Blocks
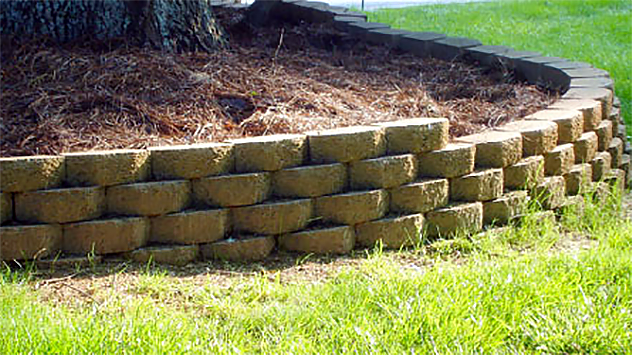
Stackable stones are made of concrete, with a decorative finish on the front and a lip on the back. The lip fits snugly against the block below it, creating an interlocking joint that holds up to pressure, while the decorative front gives an attractive finish.
The stones are often slightly wedge-shaped to allow you to create gentle curves. With many styles, thin “topper” stones are also available, to give the wall a finished appearance.
Building Tip
Stackable stones are generally recommended for walls less than 3’- 4’ high. Taller walls typically need additional structural reinforcement and may require a building permit along with professional advice or help.

Low retaining walls can also be used to create pleasing curved lines.
Materials Needed
For this project, you will need:
- Work gloves
- Shovel and/or mattock
- Brick chisel and small sledgehammer
- Level
- Wooden stakes
- String and a line level
- Soil tamper
- Gravel (sharp, not rounded) or rock dust
- Landscape fabric (optional)
- Interlocking stackable stones and toppers
Estimating the number of blocks you’ll need is tough. Count on at least one block per linear foot, and count on it taking more blocks than your estimate suggests!

Stackable stones interlock to create a strong joint with a stepped-back effect.
Layout and Planning
- Before you begin, check with your city utilities office, or dial 811 to make sure there aren’t any buried pipes or cables in your digging zone.
- Use a garden hose to lay out a pleasing line for your retaining wall. Mark the ground using flour layout lines or landscape marking paint.

A properly leveled and tamped trench is important for building a strong wall.
Digging the Trench
- Along your marked line, carefully dig a trench slightly wider than the blocks (ideally, the width of your soil tamper), and deep enough so the first course of blocks is below ground level. Cut straight down with the shovel keep from disturbing the surrounding soil.
- Make the trench as level as you can, to save time later.
- If your wall goes across a slope, you can dig a series of stepped trenches so that only one course of blocks is below ground.
- Tamp down the bottom of the trench using a soil tamper.
- Add several inches of sharp gravel or rock dust to the bottom of the trench, and use this layer to do your final leveling and tamping.
Building Tip
The pressure put on your wall will be tremendous. Putting the first course of stones below ground level will give the wall something solid to press against.
You May Also Like:
Related Videos
How to Build a Stackable Block Retaining Wall
[ad_2]
Source link